This is Part 2 in a series where I try to create a data engineering environment in the European cloud. In Part 1 I described my plan for creating a data lakehouse in the European cloud. Now it’s time to get our hands dirty. We’re going to do this in the Scaleway cloud.
The architecture
To get this data lakehouse running we will create a Kubernetes cluster and object storage for our data storage. In Kubernetes we can run containerised applications that will run our data lakehouse. I’ve consulted ChatGPT for this architecture. It had a better and more modern solution than I originally had in mind.
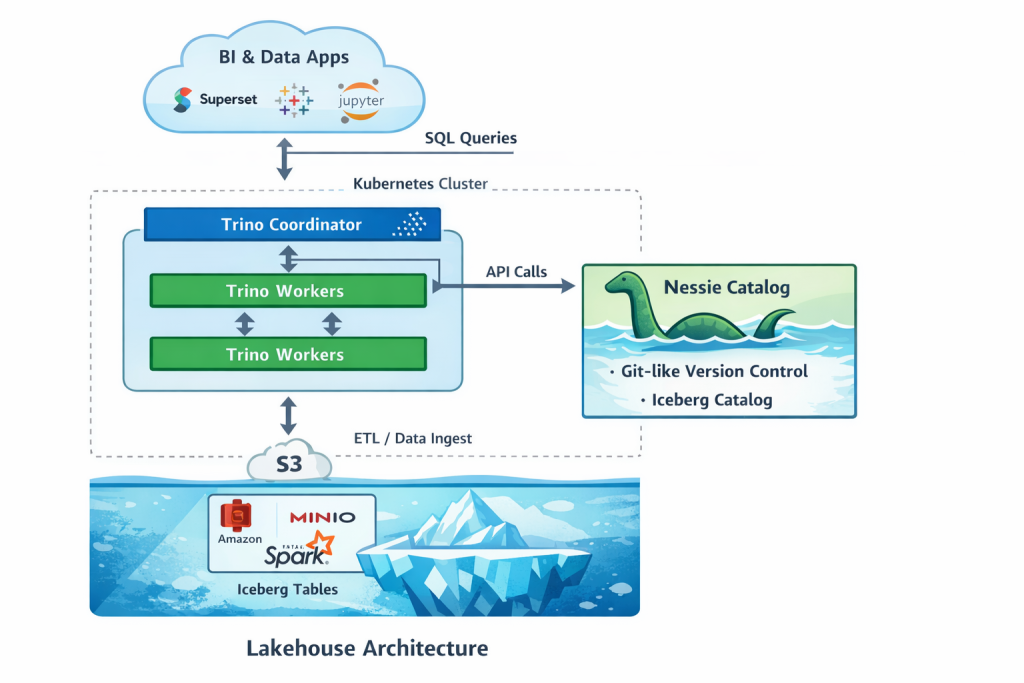
We’re going to use the Apache Iceberg open table format. This will allow us to create database like tables based on Parquet formatted files. Nessie will be the Iceberg data catalog (Hive Metastore was another option). It allows our data solutions to find the Iceberg tables and underlying Parquet files.
Trino will be the query engine. That will be the fastest way to get our first queries going.
Starting at Scaleway
First of all we need to create an account at Scaleway. You get 52 days of free usage (as I recall). So you have time to try things out. One important thing when creating your account: you will be asked to verify your account. You get limited quota if you don’t and these will not be enough to create the Kubernetes cluster. So I guess you have to. During the verification you will be asked to hold an ID in front of the camera and make a photo of your face.
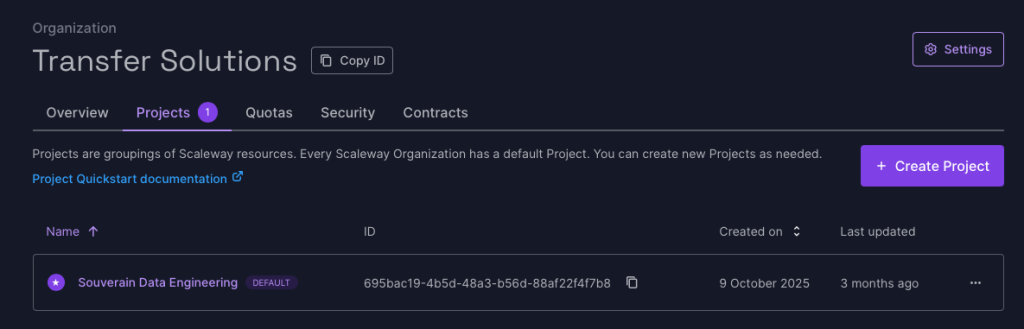
After creating your account you will be asked to define an organisation. Note: I named my organisation here after my employer, but this is project really is a private one of my own.
Next I made a project in which I misspelled sovereign. And you can’t rename it afterwards. So I have to live with that for now.
Creating the Kubernetes cluster
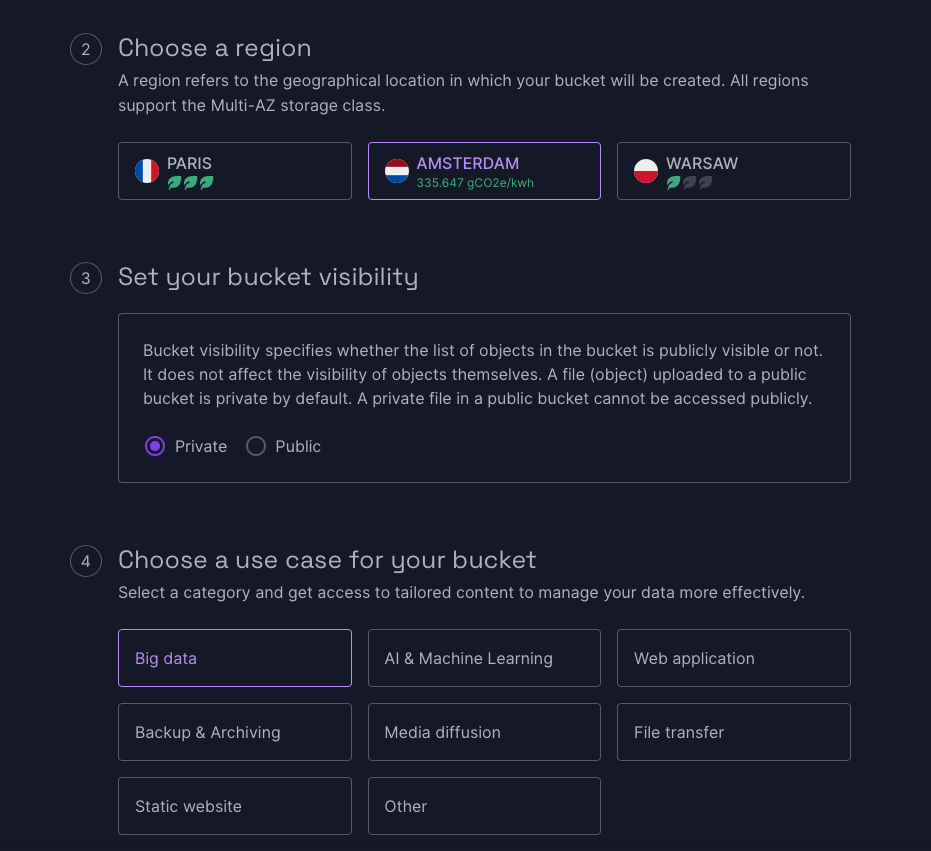
After logging in at Scaleway you enter the Scaleway Console. On the left hand menu you find the products you can build. Here, go to Containers, and then Kubernetes. Choose the region where you want to create the Kubernetes cluster. I’m starting completely greenfield here, but if you have other parts of your architecture in a particular region, you probably want this new cluster in the same region.
I’m going for the cheapest options here. So I’m going with the free control pane.
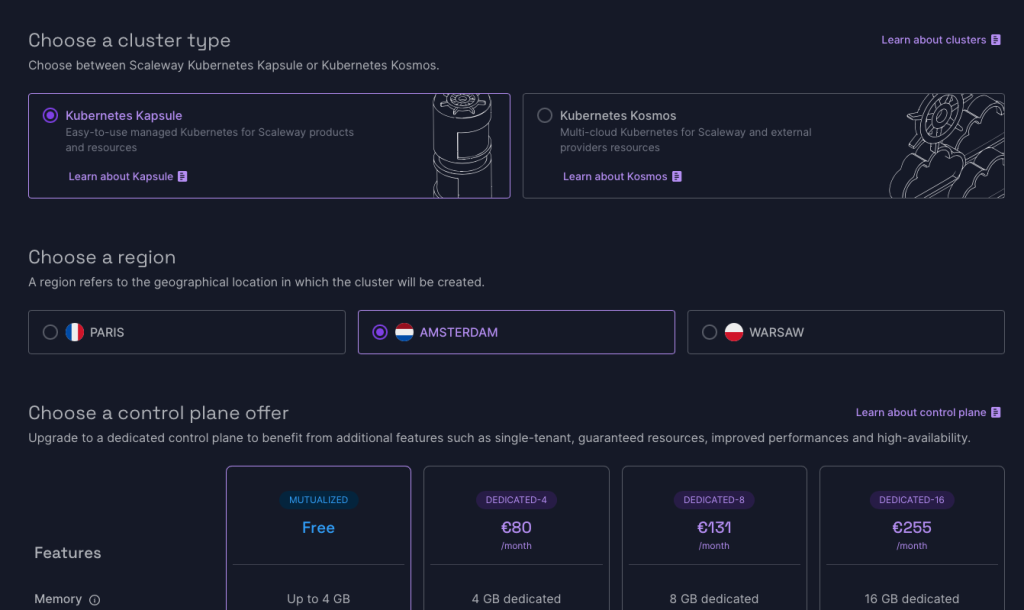
You are also going to need a Virtual Private Network, which you can create during this process. And this is free.
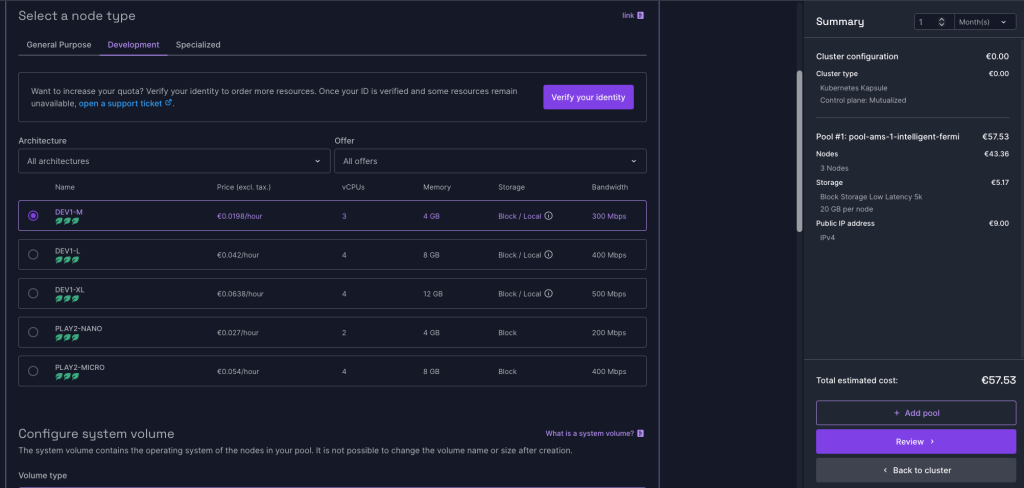
Next you need to configure a pool and this is where the costs enter the picture. Notice that you can choose a Development node type, which has the cheapest node type: DEV-M1. It is €57.53 per month. But an important point: unlike Azure Kubernetes Service, you can’t stop the cluster to cut down the costs. Once it runs, it runs. (As far as I can remember I was able to stop AKS when I wasn’t using it).
Once the cluster is running, you can go to the cluster page and then to the Kubernetes Dashboard to see the state of the cluster, or generate a kubeconfig.

I’m using kubectl and helm on the command line to get things installed. For that, the kubeconfig is very handy.
Object storage
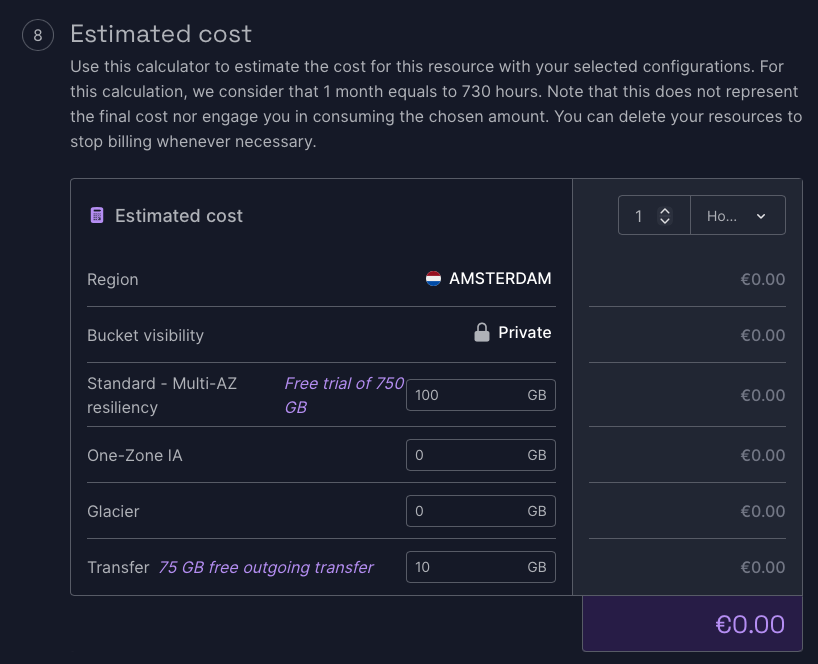
You can find this in the Scaleway Console on the left hand menu under Storage, Object storage. I have created a bucket with the name “lakehouse” in the same region as the Kubernetes cluster. You can choose between Private and Public visibility, but don’t choose Public. It is not secure and really Private works fine in this project.
You can choose the use case for the bucket. “Big data” seemed like a good choice.
And good news: object storage comes with a free 90 day trial up to 750 GB. That is more than enough for now.
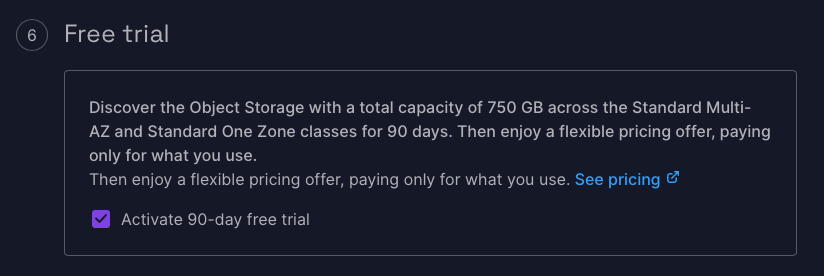
It also has an outgoing transfer setting for which I chose 10 GB.
Access to the object storage
I am going to give you the benefit of not making the same mistakes here as I did. So that you don’t need to wonder why you can’t seem to reach the block storage.
In the Scaleway Console, under Security & Identity (in the left hand menu), you’ll find IAM, or Identity and Access Management. Go to Applications and create an application. I have named it Nessie.
Under this Application we can add an API key, which we’ll be going to need when we’re installing Nessie. And yes, this API key will be used for Object Storage.
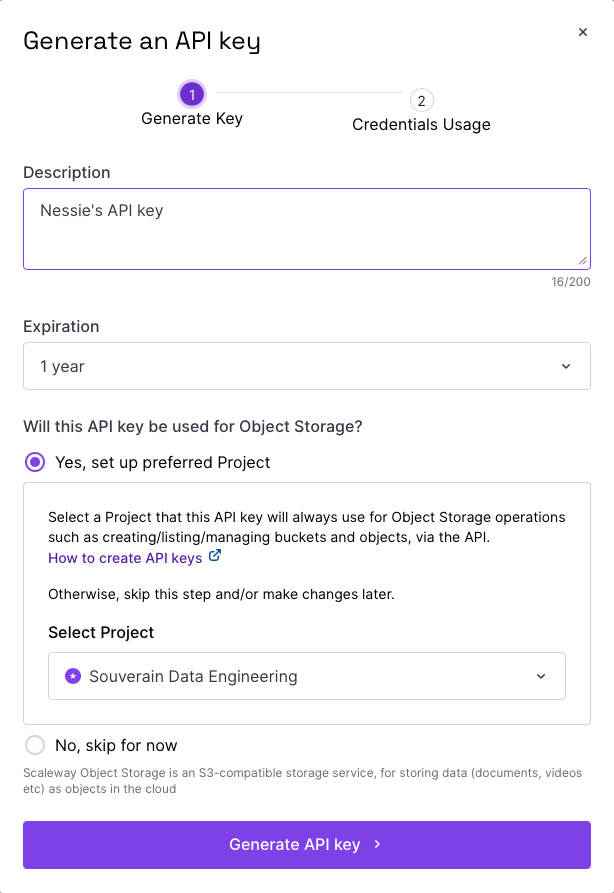
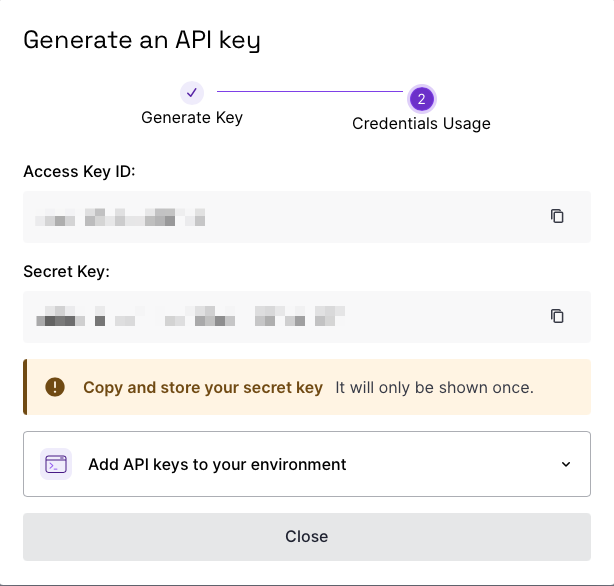
Copy the Access Key ID and Secret Key ID. It will only be shown once.
Your API key still has zero access. For this we need to add a Policy to the Application.
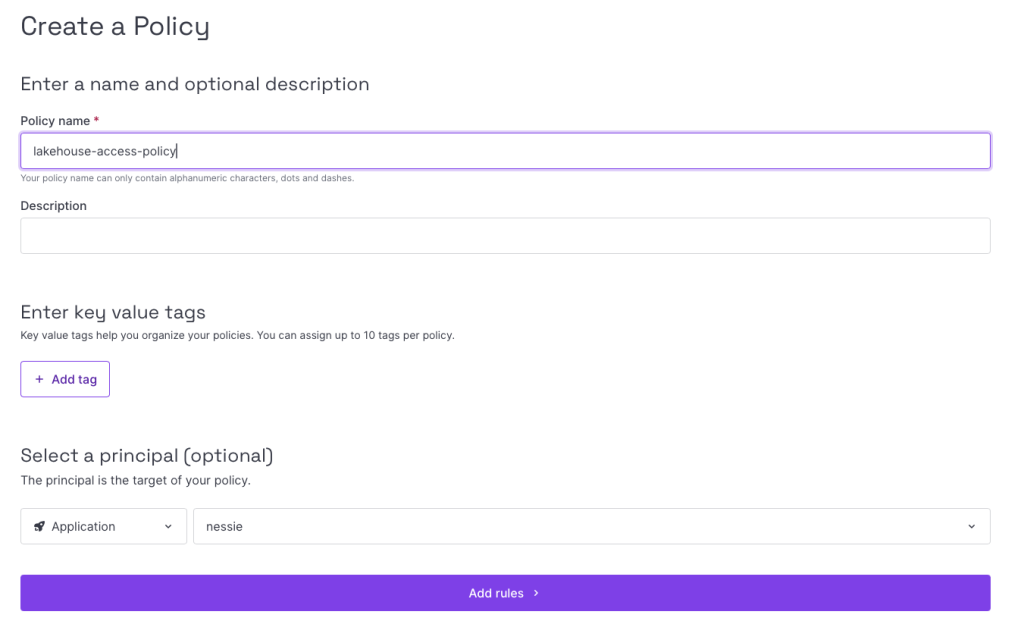
Next we need to create rules. The scope of these will be our Project.
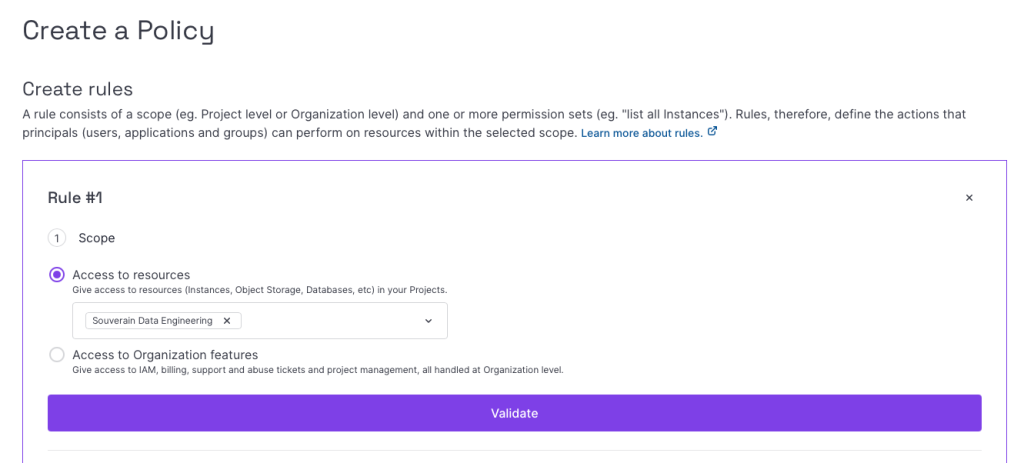
Next we choose the permission sets. Under Storage, choose ObjectStorageFullAccess. I made the mistake to pick ObjectStorageBucketPolicyFullAccess instead and that does not work.
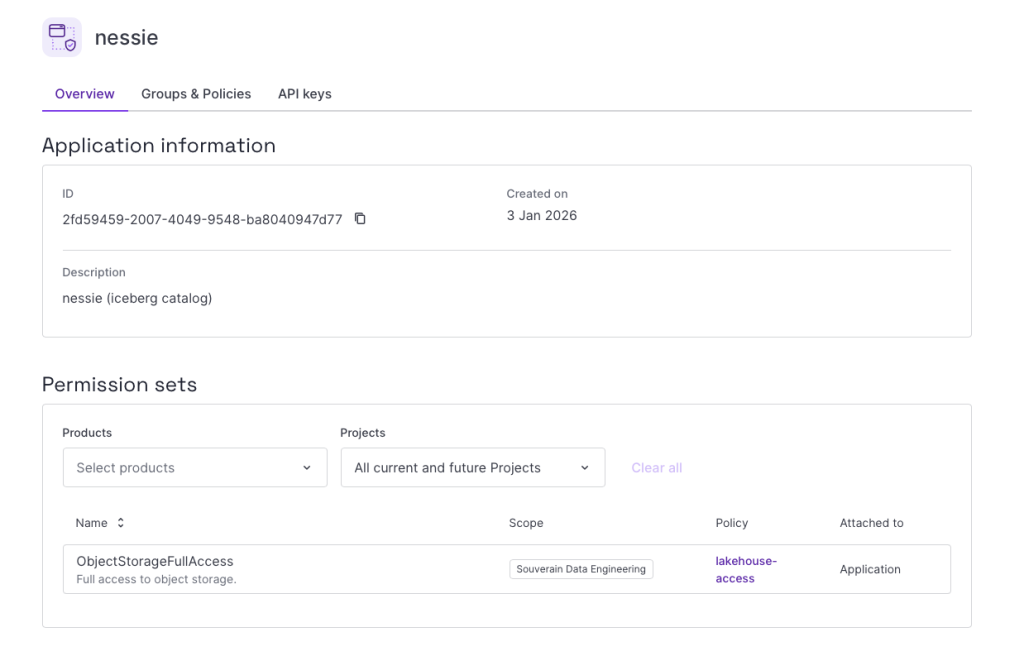
With the policy created, your application should look something like this:
Checking the Kubernetes cluster
The next steps will be done on the command line. For this you have to install kubectl and helm on your machine. I have done this on a MacBook. According to the kubectl and helm pages there are Windows versions as well.
To connect to your Kubernetes cluster with kubectl use the kubeconfig from your Kubernetes cluster overview and download the file to a directory of your choosing.
On Mac/Linux you create variable called KUBECONFIG. Now kubectl and helm will find their way to the Kubernetes cluster.
export KUBECONFIG=kubeconfig-k8s-ams-amazing-merkle.yamlLet’s see if this has worked:
kubectl cluster-infoThis will give output like this:
Kubernetes control plane is running at https://d5752251-e566-4dea-af21-f718b1f9466c.api.k8s.nl-ams.scw.cloud:6443
CoreDNS is running at https://d5752251-e566-4dea-af21-f718b1f9466c.api.k8s.nl-ams.scw.cloud:6443/api/v1/namespaces/kube-system/services/coredns:dns/proxy

To further debug and diagnose cluster problems, use 'kubectl cluster-info dump'.
That vague message tells us that Kubernetes is up and running.
Also create a namespace for this project:
kubectl create namespace lakehouseInstalling Nessie
Time to install Nessie. We’re going to use Helm for this. Helm is the package manager for Kubernetes. It allows us to install all necessary components for an application.
First we add the Nessie repository to our Helm repos:
helm repo add nessie https://charts.projectnessie.org
helm repo update
Now we need to tell Nessie where to find our object storage. For this I created a nessie-values.yaml file. You can find my example in my European cloud Github repo.
Note: you need to change the following parameters:
- NESSIE_STORAGE_S3_ENDPOINT: You can find this in the Scaleway Console in the overview of your bucket.
- NESSIE_STORAGE_S3_ACCESS_KEY and NESSIE_STORAGE_S3_SECRET_KEY are your API access and secret keys that you saved earlier.
With that all set, you can install Nessie:
helm upgrade --install nessie nessie/nessie -n lakehouse -f nessie-values.yaml(Or helm install nessie nessie/nessie -n lakehouse -f nessie-values.yaml . I went over a couple iterations.)
A good indication if the installation was successful is in the logging of the server. For this first get the name of the Kubernetes pod that Nessie is running in:
kubectl get all -n lakehouse

NAME                                     READY   STATUS    RESTARTS   AGE
pod/nessie-774fcdb9bf-t6rwv              0/1     Running   0          9s
Now that we have the name of the Kubernetes pod (pod/nessie-774fcdb9bf-t6rwv) we can ask for the logs:
kubectl logs pod/nessie-774fcdb9bf-t6rwv -n lakehouseAt the end of the logging (provided you haven’t waited too long after installing) there should be this message:
INFO exec -a "java" java -XX:MaxRAMPercentage=80.0 -XX:+UseParallelGC -XX:MinHeapFreeRatio=10 -XX:MaxHeapFreeRatio=20 -XX:GCTimeRatio=4 -XX:AdaptiveSizePolicyWeight=90 -XX:+ExitOnOutOfMemoryError -cp "." -jar /deployments/quarkus-run.jar
INFO running in /deployments
 _   _               _         ____
| \ | |             (_)       / __ \
|  \| | ___  ___ ___ _  ___  / /__\/ ___ _ ____   _____ _ __
| . ` |/ _ \/ __/ __| |/ _ \ \___. \/ _ \ '__\ \ / / _ \ '__|
| |\  |  __/\__ \__ \ |  __/ /\__/ /  __/ |   \ V /  __/ |
\_| \_/\___||___/___/_|\___| \____/ \___|_|    \_/ \___|_|

                               https://projectnessie.org/

                                    Powered by Quarkus 3.30.2
Installing Trino
Trino is a distributed query engine. You can run it on many servers. That means it has a familiar architecture: one with a coordinator that keeps track of all the workers that are doing query work.
Installing and configuring Trino took me the most time, because I followed the advice of ChatGPT. And while AI can come up with pretty decent code, too often I’ve seen ChatGPT come up with non existent or wrongly spelled parameter names. And this was such an occasion. Actually it also got the Nessie parameters wrong, but I was quickly able to find a correct example of nessie-values.yaml. But be warned when ChatGPT gives you parameters!
ChatGPT’s version of trino-values.yaml (the file to be used by Helm for installation) was a mess. So I had to write a trino-values.yaml file myself. I found some hints for this in the Trino documentation, but not enough to get it working.
The problem I ran into was that the Trino workers weren’t able to find the Trino coordinator. This I found out when I tried to get the catalog info from Trino:
trino> SHOW CATALOGS;
Error starting query at http://localhost:8080/v1/statement returned an invalid response: JsonResponse{statusCode=404, headers={content-length=[39], content-type=[text/plain;charset=iso-8859-1], date=[Sat, 03 Jan 2026 23:18:34 GMT]}, hasValue=false} [Error: Error 404 Not Found: HTTP 404 Not Found]
I checked the logging of the Trino workers and there were a lot of these messages:
026-01-03T23:13:17.589Z	WARN	http-client-memory-manager-scheduler-1	io.trino.memory.RemoteNodeMemory	Error fetching memory info from http://100.64.2.85:8080/v1/memory: Failed communicating with server: http://100.64.2.85:8080/v1/memory
2026-01-03T23:13:21.173Z	WARN	http-client-node-manager-scheduler-1	io.trino.node.RemoteNodeState	Error fetching node state from http://100.64.2.85:8080/v1/info: Failed communicating with server: http://100.64.2.85:8080/v1/info
At one point I asked Claude Code to assist me. And it turns out Claude Code is great at this. It’s like working with an experienced data engineer who checks all the failure points and logs. And then comes with good advice how to pursue further.
Claude Code came up with a version of trino-values.yaml that I would never have produced. And now you can use it too, because I have made it available on Github. Here also you need to change a couple of parameters:
- s3.endpoint: put the endpoint of the bucket here.
- s3.aws-access-key and s3.aws-secret-key: use the API keys you saved earlier here.
- iceberg.nessie-catalog.default-warehouse-dir: if your bucket has a different name, change it here.
Now we can install Trino with Helm:
helm install trino trinodb/trino -f trino-values-fixed.yaml -n lakehouseThe logs don’t give you a lot of proof that the system is actually working.
2026-01-04T22:06:37.394Z	INFO	main	io.trino.connector.StaticCatalogManager	-- Added catalog iceberg using connector iceberg --
2026-01-04T22:06:37.395Z	INFO	main	io.trino.connector.StaticCatalogManager	-- Loading catalog tpch --
2026-01-04T22:06:37.862Z	INFO	main	org.hibernate.validator.internal.util.Version	HV000001: Hibernate Validator 9.0.1.Final
2026-01-04T22:06:38.482Z	INFO	main	Bootstrap	PROPERTY                             DEFAULT     RUNTIME     DESCRIPTION
2026-01-04T22:06:38.482Z	INFO	main	Bootstrap	tpch.column-naming                   SIMPLIFIED  SIMPLIFIED
2026-01-04T22:06:38.482Z	INFO	main	Bootstrap	tpch.double-type-mapping             DOUBLE      DOUBLE
2026-01-04T22:06:38.482Z	INFO	main	Bootstrap	tpch.max-rows-per-page               1000000     1000000
2026-01-04T22:06:38.482Z	INFO	main	Bootstrap	tpch.partitioning-enabled            true        true
2026-01-04T22:06:38.482Z	INFO	main	Bootstrap	tpch.predicate-pushdown-enabled      true        true
2026-01-04T22:06:38.482Z	INFO	main	Bootstrap	tpch.splits-per-node                 1           4
2026-01-04T22:06:38.482Z	INFO	main	Bootstrap	tpch.table-scan-redirection-catalog  ----        ----
2026-01-04T22:06:38.482Z	INFO	main	Bootstrap	tpch.table-scan-redirection-schema   ----        ----
2026-01-04T22:06:39.562Z	INFO	main	io.trino.connector.StaticCatalogManager	-- Added catalog tpch using connector tpch --
2026-01-04T22:06:39.568Z	INFO	main	io.trino.security.AccessControlManager	Using system access control: default
2026-01-04T22:06:39.643Z	INFO	main	io.trino.server.Server	Server startup completed in 53.34s
2026-01-04T22:06:39.644Z	INFO	main	io.trino.server.Server	======== SERVER STARTED ========
Proof of the pudding
Therefore we need to try out creating an Iceberg table from Trino next.
First you need to do a port forward from Trino in Kubernetes to your local host.
kubectl port-forward -n lakehouse svc/trino 8080:8080I have downloaded the Trino command line client from the Trino download page to try my first connection. You can connect to it with this command:
trino --server http://localhost:8080Now we can ask for the available catalogs. You should see the following result:
trino> SHOW CATALOGS;
 Catalog
---------
 iceberg
 system
 tpcds
 tpch
(4 rows)
This means that Trino is working and there is a catalog named iceberg. Nice! And the Trino worker can contact the Trino coordinator.
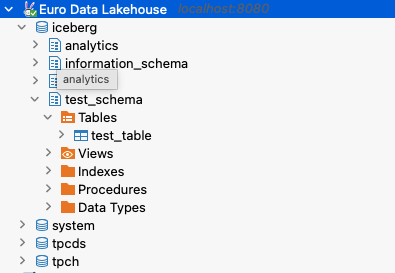
But we also need to test if we can use Iceberg. For this we are going to create a table. First we create a schema:
CREATE SCHEMA IF NOT EXISTS iceberg.test_schema;Trino will respond with the message “CREATE SCHEMA” and that would mean it was successful? But now we create the table:
CREATE TABLE iceberg.test_schema.test_table (
    id INTEGER,
    name VARCHAR,
    created_at TIMESTAMP
) WITH (
    format = 'PARQUET'
);
If the connection with the object storage is successful, the message should be:
CREATE TABLEBut if the connection with the object storage is not working, you would get:
Query 20260105_103349_00006_7kewg failed: Failed checking new table's location: s3://lakehouse/test_schema/test_table-d1400bf0888b41daa07240bcfe18d6e3Let’s try to insert a row in the table:
INSERT INTO iceberg.test_schema.test_table VALUES
      (1, 'test', CURRENT_TIMESTAMP);
Trino should respond with:
INSERT: 1 rowI call that success.
For good measure, let’s try to select the data:
trino> select * from iceberg.test_schema.test_table;
 id | name |         created_at
----+------+----------------------------
  1 | test | 2026-01-05 11:38:18.962000
(1 row)
Great! We have a working data lakehouse with Iceberg.
DBeaver connection
There’s a lot more that I would like to do with this environment, but let’s close for now with a DBeaver connection. DBeaver is a popular database tool. I use it all the time. It would be nice to reach my new data lakehouse from it. DBeaver has drivers for many types of databases. It does not come as a big surprise that DBeaver has a Trino driver as well, though you do need to download it.
This is how you can configure your Trino connection (this works if your port forwarding is still active):
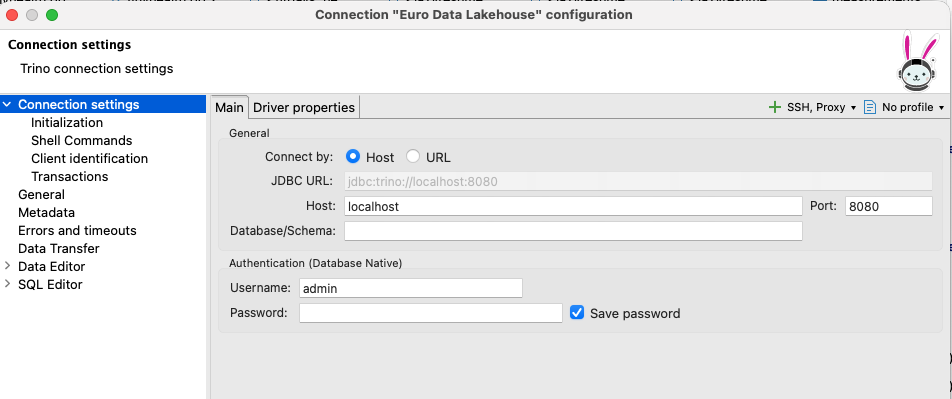
As you can see, your username is admin, but it doesn’t need a password. And now you can browse through the Iceberg schemas.
Conclusions
Note: these are opinions of my own.
I think this experiment has proven that it is possible to create a data lakehouse in the European cloud, or at least at Scaleway. And we don’t have to stop there: Spark, Kafka and other relevant products in the data ecosystem are within reach. The pricing is not that different from pricing at US cloud providers.
Creating the Kubernetes cluster and the object storage was quite easy. Once you know how the access is supposed to work in Scaleway’s IAM, it is not too hard to grasp.
The installation of Nessie was not overly complex. But without assistance of Claude Code I wonder if I would have had a working Trino setup within reasonable time (remember: this is a private project). Now that I do have a working trino-values.yaml, the setup of a data lakehouse is not so hard anymore. I can repeat this at other cloud providers.
I’m pretty happy about the user experience at Scaleway. It might not be completely on the same level as the big US cloud providers, but it comes pretty close. The user interface is very similar and it was easy to find things.
If I were an IT manager and my company had to decide on a cloud provider, I would consider Scaleway as an option. If I were at Scaleway I would expand the data portfolio with a data lakehouse. It is not that difficult. Also, making it possible to stop the Kubernetes cluster to save costs, would be a quick-win.
Questions?
I will keep the data lakehouse setup running for a couple more days. If you would like me to try something out, let me know in the comments.

0 Comments